Sunday, June 27, 2010

Grilled corn

I ran out of money when I was in Tanzania. I thought I had lost my credit card and debit card, and I called my mother in a panic, telling her to cancel the cards before someone picked them up and used them. Less than 24 hours later, I found both cards in an obscure pocket of my backpack, but too late: the cards had been cancelled, and I could only rejoin the global economy by having the cards shipped to me.
With less than 3 weeks left in Tanzania and extremely uncertain shipping times from the US to Dar es Salaam, we agreed that my cards should be sent to Vietnam, my next destination. A tricky few weeks followed, my pockets empty and my belly growling, constantly approaching my friends to borrow a few shillings.
We spent 10 days in Ifakara, a small town in the interior of Tanzania. Basically a single street, the town quickly gave up its secrets - unexpectedly speedy internet cafes, and a cluttered market where one could buy lunch. With funds low, the most cost-efficient way to fill my belly was to buy fruit and vegetables for pennies on the street, then prepare them to be eaten with a dull pocket knife and the edge of a concrete step. I sucked juice from my hands as I nibbled around the fibrous core of a mango; I smashed coconuts on the sidewalk and slurped the thin milk from cracked shells, carved the sweet flesh into my mouth, astoundingly white in this country devoid of bleach.
And I ate grilled corn. As often as I could get it. The vendors would turn the nubby, irregular ears on their charcoal grills, I would purchase an ear for less than 10 cents, and they would hand it to me with a lime wedge that had been dipped in a mixture of chile and salt. I would rub the lime wedge over the ear, covering the kernels with a mixture of lime juice and seasoning. It was genius, it was dirt-cheap, and it was absolutely delicious.

Corn is getting cheap here in Pittsburgh as the early-producing varieties start to come into season, and Sam and I bought 7 ears for a couple dollars at the farmers market. I could see no reason to deviate from the recipe of the corn vendors in Tanzania, so here it is. Enjoy.

Grilled corn (adapted from those resourceful Tanzanians)

4 ears of corn, still in husks
1 lime
pinch salt
pinch red pepper flakes, or a tiny pinch of cayenne pepper

For each ear of corn, pull back the husks without detaching them from the base of the ear. Remove the silk from inside, then fold the husks back around the ear. You want to make sure the ear is completely covered so it can steam inside the husk, so you can remove excess husks as you see fit.

Grill the ears on a hot grill, turning to brown the husks on each side. Remove from the grill and when cool, peel back husks. Mix the salt and red pepper in a small dish, then cut the lime into fourths. To serve, dip the wedges of lime into the salt mixture and rub over the ears of corn until seasoned to your liking.

Tuesday, June 8, 2010

Spring pea dumplings in lemon-sage broth: gluten-free and vegan


It is a source of great sadness to me that I never feasted on the wide variety of dumplings in the world before I went gluten-free. Sure, I ate some fantastic rice-flour packages of deliciousness in Vietnam, but it seems that most dumplings on restaurants and recipes rely on those gluten-ful wrappers (that may also contain egg). Ditto for ravioli. I used to LOVE ravioli, and I still miss its gluten-egg-cow cheese-laden goodness. One of my goals for this summer was to make gluten-free dumplings/ravioli. I have been really embracing the early summer produce lately - I have thousands of plans for strawberries once I can get to the farmer's market again - and so I fixated on a fresh, green pea dumpling. I think the picture accompanying this recipe is what really inspired me - that image of translucent dumplings with bright green innards, floating gently in a clear broth - so summery! I sat on my porch in the evening light to shell the peas.

I then blanched the shelled peas, and whipped them up in a food processor with shallots, sage, chives, olive oil, and lemon zest.


I was very, very pleased with the recipe for dumpling wrappers I found. The dough was easy to work with, and didn't taste too.. well, doughy after being steamed. I was surprised at how elastic the dough was. Rather than torture myself with rolling out dough on a surface and cutting out wrappers, I rolled and assembled each wrapper in my hands, pinching off a glob of dough and flattening it out before sealing it shut around some filling.

I got better at the wrappers as I went. You can see how thin I got one here.

I steamed the dumplings in a jury-rigged steamer - a colander balanced over a big pot of simmering water.

I was very pleased with the results - the fresh, green taste of the dumplings together with the tangy, herby broth. It made for a great dinner - even at 11 pm.

Spring pea dumplings in lemon-sage broth: gluten-free and vegan (loosely adapted from 101 Cookbooks and Epicurious)

1 cup shelled green peas

1/4 cup finely chopped fresh sage, plus a few stems, cut in half

1/4 cup finely chopped chives

1/2 cup minced shallots

zest and juice of one lemon

3 cups low-salt vegetable broth (chicken works too)

olive oil

dumpling wrapper dough (recipe follows)

Boil a medium-sized saucepan of water. Dump the shelled peas in the water, and cook very briefly, until the peas turn bright green and rise to the surface of the water. It will take less than a minute. Drain the peas immediately and pour cold water over them continuously until they are cool. This stops the peas from cooking further.

In the bowl of a food processor, or in a blender, combine the peas and 2 tablespoons of chives,2 tablespoons sage, and 1/4 cup shallots. Add half of the lemon zest, and a tablespoon of the olive oil. Process the mixture until desired texture, then season sparingly with pepper and salt. Set aside.

For each dumpling, pinch about a tablespoon of dough from the ball. Roll the small piece of dough briefly in your hands, until it has a uniform, smooth, elastic texture. Flatten out the dough in your hands, using the knuckles and heel of one hand to press the dough against the other hand. When the dough is as thin as you can get it without breaking it, or is about 4 inches in diameter, place a small amount of the filling (a little less than a tablespoon) in the center of the wrapper. Fold the wrapper over the filling and pinch the edges shut. Cover the freshly-assembled dumplings with a damp paper towel as you work, so they don't dry out.

In a medium-sized saucepan, saute the remaining shallots in the olive oil until soft. Add the broth, and the stems from the sage. Simmer.

While the broth is simmering, steam the dumplings. If you have a bamboo steamer you can use that. If not, place a small amount of water in the bottom of a large pot, so that it does not reach the bottom of a colander balanced in the pot. Oil the inside of the colander to prevent the dumplings from sticking, and arrange the dumplings inside. Cover the top of the colander. Bring the water to a simmer, and steam the dumplings until the wrappers are soft and translucent. (Took about 20 minutes for me).

Add the remaining chives, sage, and lemon zest, as well as the lemon juice, to the broth. Continue to simmer for about one more minute, then remove from heat, and season with salt and pepper to taste. Remove the sage stems.

Place a few dumplings in the bowl of each bowl and ladle the broth over them.

Dumpling wrapper dough (adapted from Hey, that tastes good!)

1/2 cup tapioca starch

1/2 cup sweet rice flour

1 teaspoon xanthan gum

1 teaspoon Ener-G egg replacer

1 tablespoon oil

5-6 tablespoons water

Combine the tapioca starch, sweet rice flour, and xanthan gum in a medium bowl, and stir to combine. In a separate small bowl, combine 5 tablespoons of water and the Ener-G egg replacer. Add the oil to the dry ingredients, then add the water mixture. Stir to combine. Add another tablespoon of water as needed. Mix the dough with clean hands to help incorporate the last of the flour, and knead briefly in your hands until the dough has a smooth and elastic texture.

Friday, June 4, 2010

Strawberry Rhubarb Crumble, gluten-free
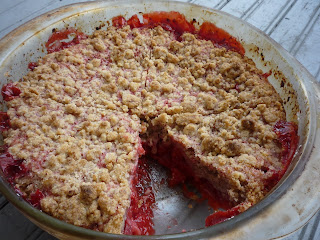


Before today, I had never eaten rhubarb. I knew a little about it - it was a late spring fruit (vegetable?), glossy ruby in color and often paired with strawberries. But rhubarb has never knowingly passed my lips. Somehow, though, I became fixated on baking a strawberry rhubarb pie. I have been obsessed with seasonality lately, and have been skulking around Pittsburgh muttering "Peas! Spinach! Strawberries! Scallions! Rhubarb! Strawberries!" You know, like a crazy person.


Enter a week of trying and failing to obtain the necessary ingredients from farmers markets. I finally succeeded yesterday, biking to the Citiparks market in Bloomfield and picking up a backpack-full of tasty produce and some wonderful runny goat yogurt. At the stand for the yogurt, I tasted a dense and flavorful feta, and also a tiny cup of lovely pink yogurt, flavored with... rhubarb! I tasted it and immediately knew that my big plan for a rhubarb-including dessert was a Very Good Idea.


When using gluten-free dough, crumbles are much easier to work with than pie crusts. There is a lot I would rather do than struggle with a fragile, tear-prone, absolutely-refuses-to-roll-out-properly dough. This crumble is so easy - the most time consuming step is washing and chopping the fruit. You mix the chopped fruit with some sugar, lemon juice and cornstarch, whip up a topping from flour, baking powder, sugar, and melted butter, dump it all in a pie dish and bake.


A note on liquid/cornstarch: my strawberries were extremely ripe, and very juicy. Adding the sugar pulled out all that liquid, resulting in something that more resembled strawberry-rhubarb soup than a pie. I decided to skip half of the lemon juice for this reason. I was nervous about all this liquid and added about 3.5 tablespoons of cornstarch, not wanting to add much more for fear of a gluey filling. Even though the filling was very liquidy, it baked up almost a little bit too firm. I guess the lesson here is don't worry too much about how liquidy your filling is!


Strawberry Rhubarb Crumble, gluten-free (adapted from... where else? Smitten Kitchen)

Topping:
1/2 cup sorghum flour
1/2 cup tapioca or potato starch
1/3 cup almond meal
1 teaspoon xanthan gum
1 teaspoon baking powder
2 tablespoons white sugar
4 tablespoons demerara/turbinado/raw sugar
zest of half a lemon
8 tablespoons margarine or butter, melted

In a medium-sized bowl, mix together all ingredients except for the margarine/butter. Pour the melted butter over the dry mixture, stirring with a fork until you form "pebbles" of various size. Refrigerate until needed.

Filling:
1 quart + a few more strawberries, washed, hulled, and quartered
1 1/2 cups of rhubarb, washed and chopped into 1-inch pieces (I chopped a bit smaller and used a bit more, which was fine)
Juice of half a lemon (increase to juice of one whole lemon depending on juiciness of strawberries)
1/2 cup of sugar (adjust to taste and the sweetness of your strawberries)
3-4 tablespoons cornstarch (adjust according to juiciness of strawberries)
pinch salt

Preheat the oven to 375.
Combine the chopped fruit in a large bowl, or right in the deep 9-inch pie dish, if you're feeling daring. Add everything except the cornstarch, and decide how much cornstarch to add based on the juiciness of the mixture.
Dump the fruit mixture in the pie dish if you didn't start out there, and sprinkle the crumble evenly over the top.
Cover a baking sheet with foil, place the pie dish on top, slide into the oven, and bake for 40-50 minutes, or when the topping has started to brown and the fruit is bubbly. Let cool on a rack before serving, and store covered in the fridge.