Saturday, July 17, 2010

The best steak of my life.


The Drover

And it was $12. Thank you, Omaha.

Monday, July 5, 2010

Peach crisp with vanilla goat milk ice cream

The weatherman says it will be 93° F tomorrow in Pittsburgh. Yesterday was Independence Day, and Sam and I feasted on shellfish, swam in a friend's pool, and narrowly avoided a riot at Point State Park when we went downtown to see the fireworks.
Extreme heat, ritual consumption of unhealthy food, water sports, and civil unrest - sounds like a classic American summer.
I have a great nostalgia surrounding summer on the east coast. When I think "July" I think hot nights, fields of fireflies, days at the local pool, the scent of honeysuckle drifting across the backyard, lying on our backs at the fairgrounds trying to catch the fireworks falling from the sky. I think of the tinkling song of the ice cream truck wending through the cul-de-sacs of our neighborhood, heat rising from the asphalt, sweat in my eyes, Wednesdays at the air-conditioned library.
Now that I'm sort-of-grownup, its interesting trying to place my current experience of summer within the framework of my childhood ideal. I am working on a research project this summer, so I spend days holed up in my apartment or in the library (again valued for its air-conditioning) with stacks of scholarly papers and government reports, losing myself in exciting ideas.
Sam has been visiting me for the last two weeks or so, and we have been filling our days with hikes in the surrounding countryside, trips to the Strip District, good times with friends, and delicious food both created and purchased. We had a wonderful sushi dinner at Chaya, complete with soy-free "soy sauce" (then we read this article and felt bad about enjoying our tuna rolls) we grilled lamb and zucchini and corn, I tried again to make injera.
With my fridge filled with farmer's market purchases, I made this delicious crisp, and the ice cream that we ate with it. Crisps are so easy to make, as I noted in the magnificent strawberry-rhubarb crisp I made earlier in the summer. I will never make a lidded pie again!
This ice cream was awesome and easy to make without an ice-cream maker. It was sweet and creamy and full of vanilla flavor. Instead of making a custard base with egg yolks, this recipe makes a pudding base using cornstarch. It works well!

Peach Crisp (crumble topping adapted from Smitten Kitchen)

6-10 ripe peaches, depending on size of peaches and depth of pie dish
Juice of half a lemon
2 tablespoons white sugar
1 tablespoon cornstarch
1 teaspoon vanilla extract

1/3 cup sorghum flour
1/3 cup tapioca or potato starch
1/3 cup almond meal
1/3 cup uncooked oats (not instant)
1 teaspoon baking powder
2 tablespoons white sugar
2 tablespoons demerara/turbinado/raw sugar
6 tablespoons margarine or butter, melted

Preheat the oven to 350.
Peel peaches if you want (you can leave the skin on, but some people don't like it) and chop into eighths. Dump the sliced peaches into a deep 9-inch pie dish. In a separate bowl, mix together the 2 tbsp sugar, lemon juice, cornstarch, and vanilla, making sure to fully mix in the cornstarch. Pour this mixture over the peaches in the dish, and stir to combine.

In a separate bowl, stir together the flours, oats, baking soda, and sugars. Pour in the melted butter, and mix together with a fork until you get "pebbles" of various sizes. Spread this mixture over the peaches, and pop the dish in the oven. Cook until the crumble topping starts to brown and you can hear the fruit bubbling, about 20 minutes.

Vanilla goat milk ice cream (adapted from Mark Bittman)

2 1/2 cups whole goat milk
1/3 cup sugar
pinch salt
1 vanilla bean
3 tablespoons cornstarch
1 teaspoon agar-agar powder
1 teaspoon vodka (optional, helps ice cream stay soft)

In a saucepan, combine 2 cups of the milk with the sugar and salt. Split the vanilla bean down its length, scrape the seeds into the mixture, then add the bean itself. Heat over medium-low heat until just steaming, and in the meantime...
In a small bowl, combine the remaining 1/2 cup of the milk with the cornstarch and agar-agar, and stir until combined. Make sure the cornstarch doesn't just stick to the bottom of the bowl!
When the milk-sugar mixture is steaming, add the cornstarch mixture and stir constantly as the mixture thickens, about 5 minutes. As soon as it starts to boil, turn the heat way down, to the lowest possible point. Cook for another 5 minutes or so, until the mixture is quite thick. Remove from heat, pour into the bowl you will use for mixing later (such as the bowl for your stand mixer), cover, and pop in the freezer.
When the mixture if fully chilled but has not yet begun to freeze, remove from the freezer and take out the vanilla bean. Add the vodka if using. Mix throughly with a handheld mixer or stand mixer at medium-high speed, then replace in the freezer. You will need to keep an eye on the mixture, removing it periodically from the freezer throughout the freezing process and mixing it throughly so ice crystals don't form and the ice cream stays light and soft.

Take a slice of the crisp, top with a big scoop of the ice cream, and sprinkle a handful of fresh local blueberries on top. Sit on the couch and eat, closing your eyes with pleasure with each bite.

Sunday, June 27, 2010

Grilled corn

I ran out of money when I was in Tanzania. I thought I had lost my credit card and debit card, and I called my mother in a panic, telling her to cancel the cards before someone picked them up and used them. Less than 24 hours later, I found both cards in an obscure pocket of my backpack, but too late: the cards had been cancelled, and I could only rejoin the global economy by having the cards shipped to me.
With less than 3 weeks left in Tanzania and extremely uncertain shipping times from the US to Dar es Salaam, we agreed that my cards should be sent to Vietnam, my next destination. A tricky few weeks followed, my pockets empty and my belly growling, constantly approaching my friends to borrow a few shillings.
We spent 10 days in Ifakara, a small town in the interior of Tanzania. Basically a single street, the town quickly gave up its secrets - unexpectedly speedy internet cafes, and a cluttered market where one could buy lunch. With funds low, the most cost-efficient way to fill my belly was to buy fruit and vegetables for pennies on the street, then prepare them to be eaten with a dull pocket knife and the edge of a concrete step. I sucked juice from my hands as I nibbled around the fibrous core of a mango; I smashed coconuts on the sidewalk and slurped the thin milk from cracked shells, carved the sweet flesh into my mouth, astoundingly white in this country devoid of bleach.
And I ate grilled corn. As often as I could get it. The vendors would turn the nubby, irregular ears on their charcoal grills, I would purchase an ear for less than 10 cents, and they would hand it to me with a lime wedge that had been dipped in a mixture of chile and salt. I would rub the lime wedge over the ear, covering the kernels with a mixture of lime juice and seasoning. It was genius, it was dirt-cheap, and it was absolutely delicious.

Corn is getting cheap here in Pittsburgh as the early-producing varieties start to come into season, and Sam and I bought 7 ears for a couple dollars at the farmers market. I could see no reason to deviate from the recipe of the corn vendors in Tanzania, so here it is. Enjoy.

Grilled corn (adapted from those resourceful Tanzanians)

4 ears of corn, still in husks
1 lime
pinch salt
pinch red pepper flakes, or a tiny pinch of cayenne pepper

For each ear of corn, pull back the husks without detaching them from the base of the ear. Remove the silk from inside, then fold the husks back around the ear. You want to make sure the ear is completely covered so it can steam inside the husk, so you can remove excess husks as you see fit.

Grill the ears on a hot grill, turning to brown the husks on each side. Remove from the grill and when cool, peel back husks. Mix the salt and red pepper in a small dish, then cut the lime into fourths. To serve, dip the wedges of lime into the salt mixture and rub over the ears of corn until seasoned to your liking.

Tuesday, June 8, 2010

Spring pea dumplings in lemon-sage broth: gluten-free and vegan


It is a source of great sadness to me that I never feasted on the wide variety of dumplings in the world before I went gluten-free. Sure, I ate some fantastic rice-flour packages of deliciousness in Vietnam, but it seems that most dumplings on restaurants and recipes rely on those gluten-ful wrappers (that may also contain egg). Ditto for ravioli. I used to LOVE ravioli, and I still miss its gluten-egg-cow cheese-laden goodness. One of my goals for this summer was to make gluten-free dumplings/ravioli. I have been really embracing the early summer produce lately - I have thousands of plans for strawberries once I can get to the farmer's market again - and so I fixated on a fresh, green pea dumpling. I think the picture accompanying this recipe is what really inspired me - that image of translucent dumplings with bright green innards, floating gently in a clear broth - so summery! I sat on my porch in the evening light to shell the peas.

I then blanched the shelled peas, and whipped them up in a food processor with shallots, sage, chives, olive oil, and lemon zest.


I was very, very pleased with the recipe for dumpling wrappers I found. The dough was easy to work with, and didn't taste too.. well, doughy after being steamed. I was surprised at how elastic the dough was. Rather than torture myself with rolling out dough on a surface and cutting out wrappers, I rolled and assembled each wrapper in my hands, pinching off a glob of dough and flattening it out before sealing it shut around some filling.

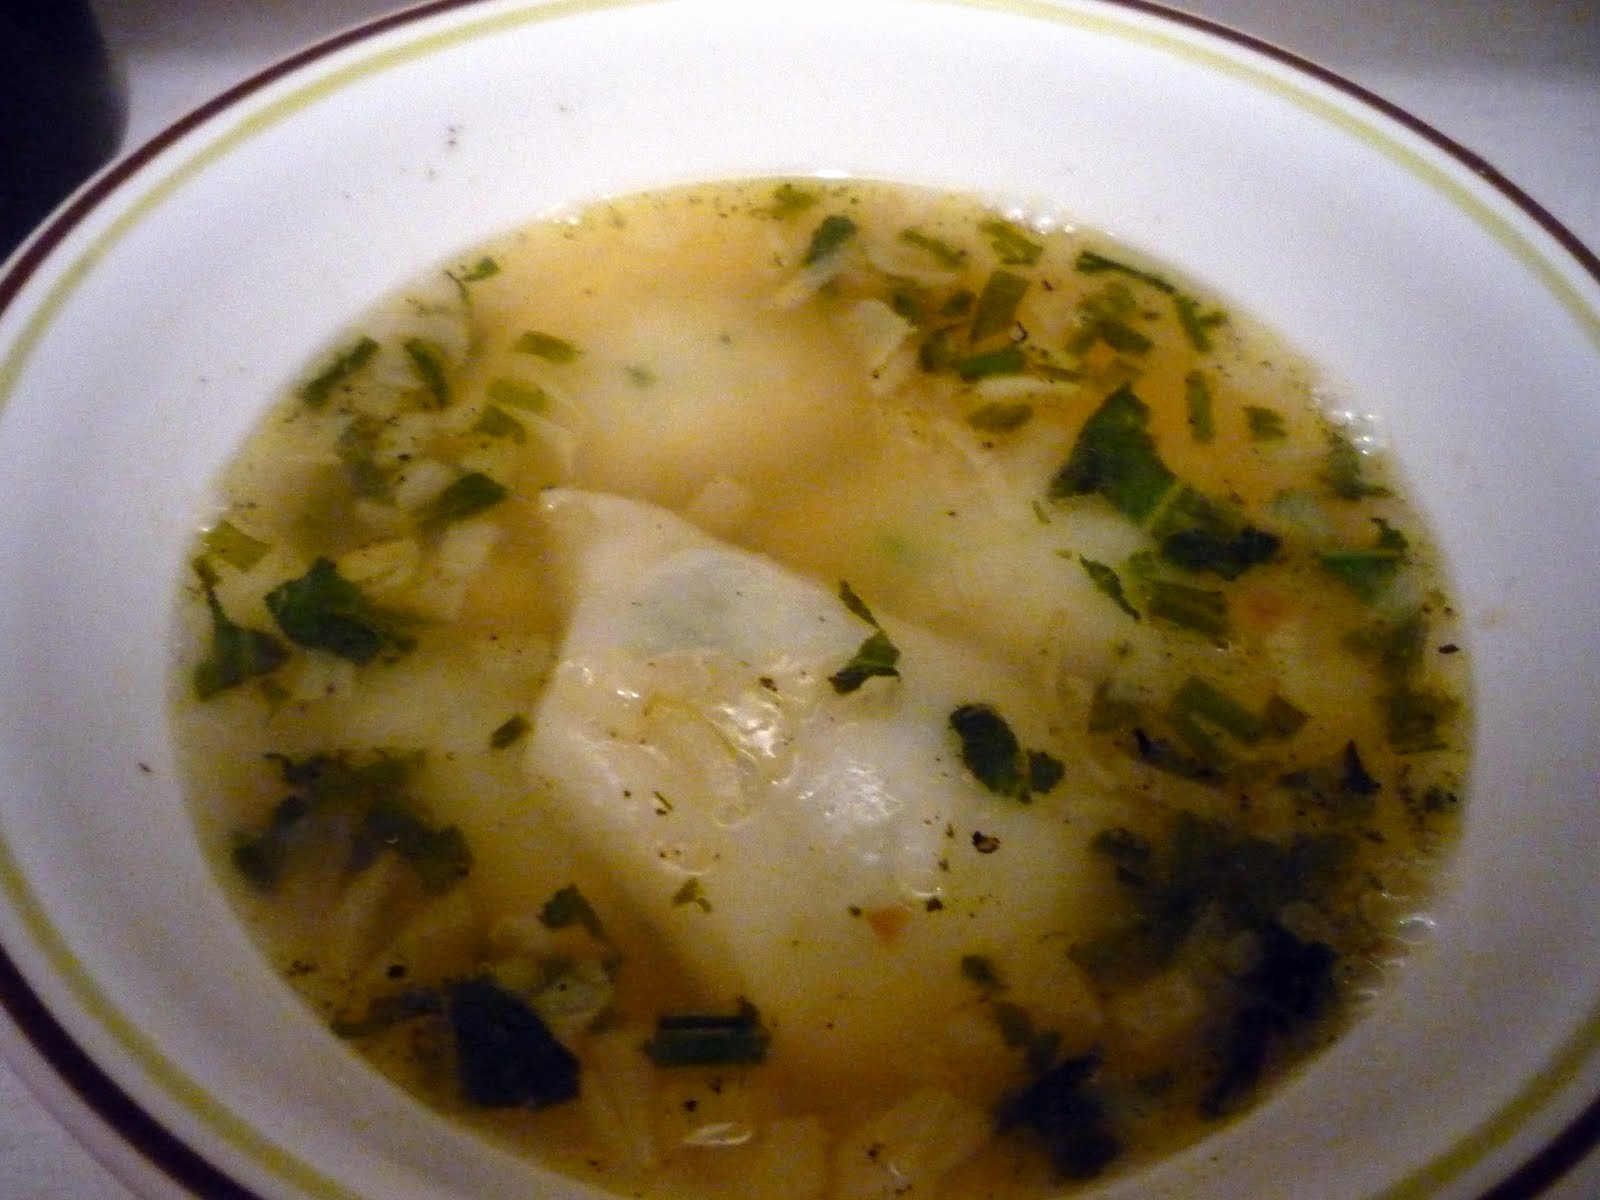
I got better at the wrappers as I went. You can see how thin I got one here.

I steamed the dumplings in a jury-rigged steamer - a colander balanced over a big pot of simmering water.

I was very pleased with the results - the fresh, green taste of the dumplings together with the tangy, herby broth. It made for a great dinner - even at 11 pm.

Spring pea dumplings in lemon-sage broth: gluten-free and vegan (loosely adapted from 101 Cookbooks and Epicurious)

1 cup shelled green peas

1/4 cup finely chopped fresh sage, plus a few stems, cut in half

1/4 cup finely chopped chives

1/2 cup minced shallots

zest and juice of one lemon

3 cups low-salt vegetable broth (chicken works too)

olive oil

dumpling wrapper dough (recipe follows)

Boil a medium-sized saucepan of water. Dump the shelled peas in the water, and cook very briefly, until the peas turn bright green and rise to the surface of the water. It will take less than a minute. Drain the peas immediately and pour cold water over them continuously until they are cool. This stops the peas from cooking further.

In the bowl of a food processor, or in a blender, combine the peas and 2 tablespoons of chives,2 tablespoons sage, and 1/4 cup shallots. Add half of the lemon zest, and a tablespoon of the olive oil. Process the mixture until desired texture, then season sparingly with pepper and salt. Set aside.

For each dumpling, pinch about a tablespoon of dough from the ball. Roll the small piece of dough briefly in your hands, until it has a uniform, smooth, elastic texture. Flatten out the dough in your hands, using the knuckles and heel of one hand to press the dough against the other hand. When the dough is as thin as you can get it without breaking it, or is about 4 inches in diameter, place a small amount of the filling (a little less than a tablespoon) in the center of the wrapper. Fold the wrapper over the filling and pinch the edges shut. Cover the freshly-assembled dumplings with a damp paper towel as you work, so they don't dry out.

In a medium-sized saucepan, saute the remaining shallots in the olive oil until soft. Add the broth, and the stems from the sage. Simmer.

While the broth is simmering, steam the dumplings. If you have a bamboo steamer you can use that. If not, place a small amount of water in the bottom of a large pot, so that it does not reach the bottom of a colander balanced in the pot. Oil the inside of the colander to prevent the dumplings from sticking, and arrange the dumplings inside. Cover the top of the colander. Bring the water to a simmer, and steam the dumplings until the wrappers are soft and translucent. (Took about 20 minutes for me).

Add the remaining chives, sage, and lemon zest, as well as the lemon juice, to the broth. Continue to simmer for about one more minute, then remove from heat, and season with salt and pepper to taste. Remove the sage stems.

Place a few dumplings in the bowl of each bowl and ladle the broth over them.

Dumpling wrapper dough (adapted from Hey, that tastes good!)

1/2 cup tapioca starch

1/2 cup sweet rice flour

1 teaspoon xanthan gum

1 teaspoon Ener-G egg replacer

1 tablespoon oil

5-6 tablespoons water

Combine the tapioca starch, sweet rice flour, and xanthan gum in a medium bowl, and stir to combine. In a separate small bowl, combine 5 tablespoons of water and the Ener-G egg replacer. Add the oil to the dry ingredients, then add the water mixture. Stir to combine. Add another tablespoon of water as needed. Mix the dough with clean hands to help incorporate the last of the flour, and knead briefly in your hands until the dough has a smooth and elastic texture.

Friday, June 4, 2010

Strawberry Rhubarb Crumble, gluten-free


Before today, I had never eaten rhubarb. I knew a little about it - it was a late spring fruit (vegetable?), glossy ruby in color and often paired with strawberries. But rhubarb has never knowingly passed my lips. Somehow, though, I became fixated on baking a strawberry rhubarb pie. I have been obsessed with seasonality lately, and have been skulking around Pittsburgh muttering "Peas! Spinach! Strawberries! Scallions! Rhubarb! Strawberries!" You know, like a crazy person.


Enter a week of trying and failing to obtain the necessary ingredients from farmers markets. I finally succeeded yesterday, biking to the Citiparks market in Bloomfield and picking up a backpack-full of tasty produce and some wonderful runny goat yogurt. At the stand for the yogurt, I tasted a dense and flavorful feta, and also a tiny cup of lovely pink yogurt, flavored with... rhubarb! I tasted it and immediately knew that my big plan for a rhubarb-including dessert was a Very Good Idea.


When using gluten-free dough, crumbles are much easier to work with than pie crusts. There is a lot I would rather do than struggle with a fragile, tear-prone, absolutely-refuses-to-roll-out-properly dough. This crumble is so easy - the most time consuming step is washing and chopping the fruit. You mix the chopped fruit with some sugar, lemon juice and cornstarch, whip up a topping from flour, baking powder, sugar, and melted butter, dump it all in a pie dish and bake.


A note on liquid/cornstarch: my strawberries were extremely ripe, and very juicy. Adding the sugar pulled out all that liquid, resulting in something that more resembled strawberry-rhubarb soup than a pie. I decided to skip half of the lemon juice for this reason. I was nervous about all this liquid and added about 3.5 tablespoons of cornstarch, not wanting to add much more for fear of a gluey filling. Even though the filling was very liquidy, it baked up almost a little bit too firm. I guess the lesson here is don't worry too much about how liquidy your filling is!


Strawberry Rhubarb Crumble, gluten-free (adapted from... where else? Smitten Kitchen)

Topping:
1/2 cup sorghum flour
1/2 cup tapioca or potato starch
1/3 cup almond meal
1 teaspoon xanthan gum
1 teaspoon baking powder
2 tablespoons white sugar
4 tablespoons demerara/turbinado/raw sugar
zest of half a lemon
8 tablespoons margarine or butter, melted

In a medium-sized bowl, mix together all ingredients except for the margarine/butter. Pour the melted butter over the dry mixture, stirring with a fork until you form "pebbles" of various size. Refrigerate until needed.

Filling:
1 quart + a few more strawberries, washed, hulled, and quartered
1 1/2 cups of rhubarb, washed and chopped into 1-inch pieces (I chopped a bit smaller and used a bit more, which was fine)
Juice of half a lemon (increase to juice of one whole lemon depending on juiciness of strawberries)
1/2 cup of sugar (adjust to taste and the sweetness of your strawberries)
3-4 tablespoons cornstarch (adjust according to juiciness of strawberries)
pinch salt

Preheat the oven to 375.
Combine the chopped fruit in a large bowl, or right in the deep 9-inch pie dish, if you're feeling daring. Add everything except the cornstarch, and decide how much cornstarch to add based on the juiciness of the mixture.
Dump the fruit mixture in the pie dish if you didn't start out there, and sprinkle the crumble evenly over the top.
Cover a baking sheet with foil, place the pie dish on top, slide into the oven, and bake for 40-50 minutes, or when the topping has started to brown and the fruit is bubbly. Let cool on a rack before serving, and store covered in the fridge.

Saturday, May 22, 2010

Gluten-free soy-free egg-free Dulce de Leche Cheesecake with goats’ milk


Cheesecake without cows’ milk! I bet you didn’t know it was possible. I sure didn’t until recently, when I unwrapped a soft, mild chevre. Spreading it on some gluten-free crackers, I thought “Wow, this tastes just like cream cheese!” If you are unable to eat cow’s dairy, as I am, you probably miss cheesecake, since goat’s cream cheese doesn’t seem to exist on any planet. What a surprise it was to me that I could use chevre in place of this elusive ingredient.

I started this recipe at 5pm on Thursday evening, hoping I would be able to finish it in time to bring to my friends house at 9pm that night. Please excuse me while I chuckle knowingly at my naiveté. It is Saturday afternoon, and I am only just getting my first bite of this delicious cheesecake.

Granted, this is counting long breaks to sleep, work, and do other various things, but let’s be honest here. This cheesecake, as I made it, involves a batch of cookies being whipped up, baked and ground, a pan of dulce de leche spending 3 hours on the stove, and a finally-filled cheesecake spending 45 minutes in the oven, 2 hours on the cooling rack, and 6 hours in the refrigerator. This is not a dessert for those desiring instant gratification.

But, oh man, was it worth it.

Now, I have stolen this recipe from Smitten Kitchen (again), but have adapted it in a number of ways. Obviously, cream cheese and eggs and graham crackers have been replaced by things I can eat. I also elected to make this as a traditional round cheesecake in a pie dish, rather than in squares, and I omitted the chocolate glaze, wanting a more pure dulce de leche flavor and lacking the resolve to go through one more step.

This recipe is an undertaking, but it is less so if you have fewer allergies than me. You can use store-bought cookies or graham crackers for the crust, and even store-bought dulce de leche (or use the condensed milk recipe, which is much easier, found at the end of the original recipe at smitten kitchen). Good luck, and enjoy your cheesecake.


Gluten-free soy-free egg-free Dulce de Leche Cheesecake with goats’ milk (adapted from Smitten Kitchen)

Crust
1 cup crumbled gluten free cookies (ginger is delicious) or graham crackers. Or you can use my ginger cookie recipe, below.
2 tablespoons sugar (omit if using a sweet cookie, like my ginger cookies)
3 tablespoons unsalted butter or margarine, melted

Filling
1 teaspoon unflavored gelatin (about half an envelope of the Knox stuff) or 1 teaspoon agar-agar (this will make it vegetarian)
1/4 cup whole milk or a creamy milk substitute, such as soy, almond, or hemp milk.
8 oz mild chevre (soft goat cheese) or cream cheese, softened.
2 large eggs or equivalent in Ener-G egg replacer
3/8 teaspoon salt (skip this if using a salty chevre)
1 cup dulce de leche (recipe below)

To make the crust:
Preheat oven to 325, making sure your oven rack is in the centre position. Grease the inside of a 9-inch round pie dish (a heavy glass one works best) with butter or a neutral oil. Take the cookies/graham crackers you have decided to use and grind them up in a food processor. (If you don’t have a food processor, you can put the cookies in a large Ziploc bag, cover the bag with a dish towel, and roll a rolling pin over the towel, pressing down to crush the cookies. When the cookies have been ground down to crumbs, transfer them to a bowl) If using graham crackers, add the sugar and mix in. Add the butter and mix until combined. Press this mixture into the pie dish, on the bottom and up the sides as far as it will go without being too thin. Pop in the oven and bake for 10 minutes, then remove from the oven and let cool for 5 minutes.

To make the filling:
While the crust is baking/ cooling, pour the milk or milk substitute into a small bowl and sprinkle the gelatin/agar agar over the surface. Let stand for 2 minutes. In the bowl of a stand mixer, or a large bowl if you are using a hand-mixer/your guns, add the chevre/cream cheese, the eggs/egg replacer, and the salt, if using. Add the gelatin-milk mixture, making sure to scrape up all the potential clumps at the bottom of the small bowl. Beat at medium speed for about two minutes until well combined, scraping the bowl as needed. Gradually add the dulce de leche.

Pour the filling into the crust in your pie dish, making sure the top is smooth and beautiful. Don’t stress out if the filling reaches above the top of your crust, it will be ok. Place the pie dish in a water bath – a large, 9x13 pan full of hot water. Very carefully place this in the oven, and bake for about 45 minutes, until the center is just barely set. Remove from the oven and cool on a rack for 2 hours, then refrigerate for at least 6 hours.

Ginger cookies for crust (adapted from All Recipes.com)

This recipe makes way more than you need for the crust. You only need a cup of crumbs, which for me was about half of this recipe. You can easily bake half of these for the crust, then put the rest of the dough (well-wrapped) in the fridge or freezer
for ginger cookie deliciousness later.

1 cup sorghum flour
1/2 cup tapioca starch
1/2 cup potato starch
1/4 cup almond meal/flour
2 teaspoons ground ginger
1 teaspoon baking soda
3/4 teaspoon ground cinnamon
1/2 teaspoon ground cloves
1/4 teaspoon salt (I omit this because the dairy/soy-free spread I use is salted)
3/4 cup butter or margarine, softened
3/4 cup white sugar
1 egg or equivalent in Ener-G egg replacer
1/4 cup molasses
2 tablespoons white sugar

Preheat the oven to 350. Prepare a baking sheet with parchment paper or a Silpat. Stir together the dry ingredients – flours, spices, and baking soda. Set aside.
In a stand mixer, with a handheld mixer, or with a whisk and your biceps, beat the butter/margarine until creamy. Add the 3/4 cup sugar and cream together until light and fluffy. Add the egg/egg replacer, and then the molasses. Gradually stir in the dry ingredients, adding a little bit at a time.
Put your 2 tbsp sugar in a shallow bowl or on a small plate. Take the dough and form small balls, about 1 inch in diameter. Roll each ball in the sugar before placing on the baking sheet.
If you are making these to eat as cookies, bake them for 8 minutes for a very soft cookie, or 10 minutes for one with more of a crisp to it. Remove the cookies from the sheet immediately and cool on a rack. If you are making these to use as a crust, bake for 12-14 minutes. You want these to get as crisp as possible in the oven without burning them, so monitor them very closely. If using for the crust, you need to let these cool and harden completely on a rack before starting the crust.

Dulce de Leche (adapted from Alton Brown)

1 quart (4 cups) whole goats milk
1 vanilla bean
1 ½ cups white sugar
1/2 teaspoon baking soda

Before you start, take the saucepan you are going to use – you want one that seems much too large for the volume of liquid – you’ll see why below. Measure out one cup of water and put it in the saucepan, and note what that volume looks like – how far it goes up the side of the pan. This will help you know when the dulce de leche is done much later. Dump out the water, you won’t be needing it. Water your plants.
Place the milk and sugar in a large saucepan. Split the vanilla bean and scrape the seeds into the milk, then add the bean.
Turn on the medium heat and simmer, stirring occasionally, until the sugar is dissolved.
Add the baking soda and stir to combine. This is why you want a large saucepan! It will froth and foam like mad!
Turn the heat down to low and simmer at the lowest possible level – you want the surface to be slightly agitated, but do not let it boil. Continue to simmer, uncovered, stirring regularly, watching the liquid slowly take on a wonderful golden hue. After about an hour, remove the vanilla bean.
Continue to simmer about another 1 ½ to 2 hours, until the liquid has reduced to about one cup and has taken on a deep, dark caramel color. Use the color and the volume (remembering what one cup of liquid looked like with the water earlier) to decide when you’re done. Do not use thickness! If you wait until you have a “proper dulce de leche thickness” on the stove, your cooled dulce de leche will be way too firm!
Take the pan off the heat and let cool before using in cheesecake filling. If making ahead, refrigerate in an air-tight container.

Friday, May 7, 2010

Vanilla-cinnamon goats' milk panna cotta with caramel sauce


So, Cinco de Mayo was a few days ago. I am at home with my family for about 10 days, until I return to Pittsburgh to see Sam graduate and to start my summer. I have been cooking for my family almost every night, which I enjoy. It is a pleasure to work in my parents' large, well-equipped kitchen, and I love having a dishwasher that is not me. My parents don't get too excited about cooking, so they are more than happy to give up the title of head cook. Also, if I cook, I am able to control exactly what is put in front of me, and so am able to both avoid allergens and include the foods I love.

For the holiday, I soaked some diced chicken breasts in a lime-garam masala-brown sugar marinade for about 24 hours, then roasted them to roll up in corn tortillas for enchiladas in a mole-ish sauce. I also made my favorite black bean salad, with red onion, tomatoes, garlic, cilantro, and lime juice.

For dessert I wanted to make flan or creme caramel, since this is a fun Mexican-themed dessert. However, most of these recipes contain eggs. I decided that panna cotta was close enough, since this Italian pudding is naturally egg-free. I flavored it with some cinnamon and vanilla, and topped it with a rich, buttery caramel sauce. Yum yum.


Vanilla-cinnamon goats' milk panna cotta (adapted from David Lebovitz)

4 cups whole goats' milk
1/2 cup sugar
2 teaspoons vanilla extract
1 teaspoon cinnanon
4 1/2 teaspoons unflavored gelatin
4 tablespoons cold water

Put the cold water in a bowl large enough to accommodate all ingredients. Add the gelatin and let stand for five to ten minutes, until softened.

While the gelatin is softening, put the milk and sugar in a medium-sized saucepan and heat on low until the sugar is dissolved. This step can also be done in the microwave. Remove from heat. You do not want to boil the milk or reduce it, just dissolve the sugar. Stir in the cinnamon and vanilla until well-combined.

Take eight custard cups and oil the insides with an neutral oil. If you don't have eight cups of equal size, improvise!

Add the very warm milk mixture to the gelatin and mix until all clumps of gelatin are dissolved.

Divide the mixture out into the oiled cups and cover each cup tightly with plastic wrap. Refrigerate for at least two hours, or until firm.

When you are ready to eat, unmold the panna cotta by sliding a thin sharp knife around the edge of each cup, then invert the cup onto a serving plate. Top with caramel sauce, if desired (recipe below).

Caramel sauce (adapted from Smitten Kitchen)

1/2 cup white sugar
3 tbsp salted butter or margarine
1/4 cup whole goats' milk

Heat the sugar over medium heat in a saucepan bigger than you think you'll need. Stir constantly at first, making sure the sugar melts evenly. Continue cooking the liquefied sugar until it has taken on a beautiful, coppery color, stirring frequently to ensure it does not burn. Do not taste it! Hot sugar is burny and will instantly cool on your teeth, giving you some (literally) sweet grillz.
When the sugar is the right color, add the butter, and stir in to combine. Turn off the heat, and stir in the milk. It will foam up a lot.
If not using right away, store tightly covered in the refrigerator.